
This has been a long time in the works.
With the upcoming release of Patchwork 2.0, Patchwork will provides first class support for series, or collections of patches, and expose these (and much more besides) over a new REST API. Coupled with the Check support added in 1.1, we will be able to use Patchwork with continuous integration and automated testing tools like Jenkins to validate projects using the mailing list workflow.
Below is the result of my own experiments coupling Patchwork with Jenkins. Be aware that this represents but the very basics of what one can do with this functionality. However, I aim to build upon this later and this should still serve to illustrate most of the key concepts. An even simpler guide will be available in the Patchwork documentation shortly.
NOTE: This guide has been updated since publication to reflect the changes found in Patchwork 2.0.
Initializing Services
Before we begin, we need to install both Patchwork and Jenkins. I chose to use Docker for this, though Patchwork can also be installed manually.
Patchwork
First up, Patchwork. Clone the Patchwork repo and bring up the project, as described in the docs:
$ git clone https://github.com/getpatchwork/patchwork

$ cd patchwork
$ docker-compose build
$ docker-compose up
Leave this running and jump to another tab.
You should also create an superuser that you can use manage the instance. I
used admin and tester for username and password, respectively:
$ docker-compose run --rm web python manage.py createsuperuser
Once initialized, you should be able to browse Patchwork at localhost:8000.
A default Patchwork project will have been created, which we will use for
this demo.
Jenkins
Now for Jenkins. We’ll follow the instructions provided on the the Docker Hub page. Run:
$ docker pull jenkins
$ docker run --name myjenkins -p 8080:8080 -p 50000:50000 \
    -v /var/jenkins_home jenkins
Browse to the Jenkins URL (localhost:8080), where you will be asked to
authenticate, create a user, and select which plugins to install. I used
admin and tester for username and password once again, then chose the
following plugins:
-
Git plugin
-
Parameterized Trigger plugin
-
Timestamper
Note that you can install additional plugins if necessary but these are the bare minimum.
Summary
Once this step is completed, both services should be accessible: the Patchwork
instance at localhost:8000 and the Jenkins instance at localhost:8080.
Both instances should have a user account configured, using the admin
username and tester password. Finally, the Patchwork instance should have the
default Patchwork project. Record all of these details for future steps.
Configuring Services
Once the services are initialized, we need to configure them.
Patchwork
There isn’t really much initial configuration necessary for Patchwork. You
should already have a user account created and Patchwork will use the default
default Patchwork project. One step that is necessary is to assign your
user, admin in this case, as a maintainer of the Patchwork project. This is
necessary to ensure we can upload test results, change the state of patches
etc. You can do this using the admin console:
http://localhost:8000/admin/auth/user/1/change/
We also need to extract the IP address of the Docker container running the
Patchwork instance. This is necessary so Jenkins can communicate with the
instance. You can extract the IP address using docker inspect, per this
StackOverflow answer:
$ docker inspect \
    -f '{{range .NetworkSettings.Networks}}{{.IPAddress}}{{end}}' \
    <CONTAINER_NAME_OR_ID>
where <CONTAINER_NAME_OR_ID> refers to the active patchwork_web container.
This will return an IP address, in my case 172.17.0.3. Ensure you can access
the Patchwork instance via this address (including port) - for example at
172.17.0.3:8000 - then store this IP for later.

A Patchwork instance fresh out of the oven
Jenkins
Before beginning, you should extract your user’s “token”. We will use this to talk to the Jenkins API in a later step. Browse to your user settings to obtain this and copy it down somewhere:
http://localhost:8080/user/admin/configure
Once you have this token stored, we can move onto configuring the Jenkins job. We’re going to make heavy use of Parameterized Builds and the Remote Access API, both of which are part of the default Jenkins install.
Create a new “freestyle” project, setting the project name and description to something useful. You also need to define two parameters:
-
MBOX_URLThe URL to download the patch from.
-
CHECK_URLThe URL to report the test result to.
While we could expand the available parameters to avoid hard-coding variables and make the job more flexible, we’re going to keep it simple for now.
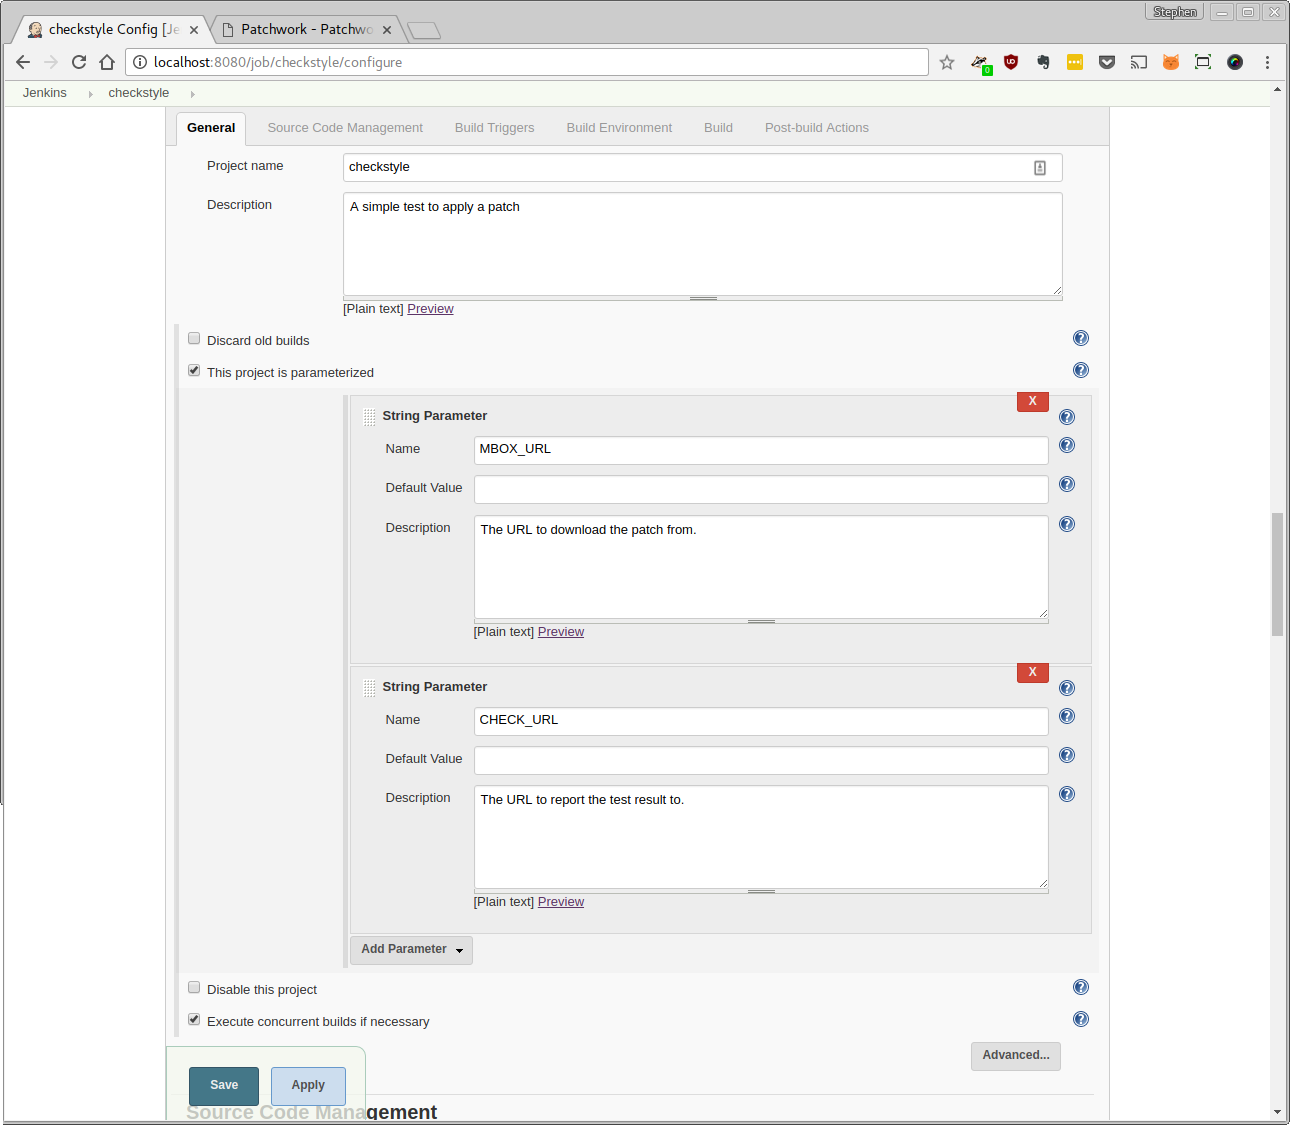
General
Next, configure Jenkins to check out the code from the project of choice in the Source Code Management section. We’re testing Patchwork, so we’re going to use Git and the GitHub repo. For reference, the Patchwork repo URL is:
https://github.com/getpatchwork/patchwork.git
You don’t need to specify credentials, nor should you change the default branch specifier. You should, however, enable the Clean before checkout behavior, to ensure old tests don’t corrupt newer tests.
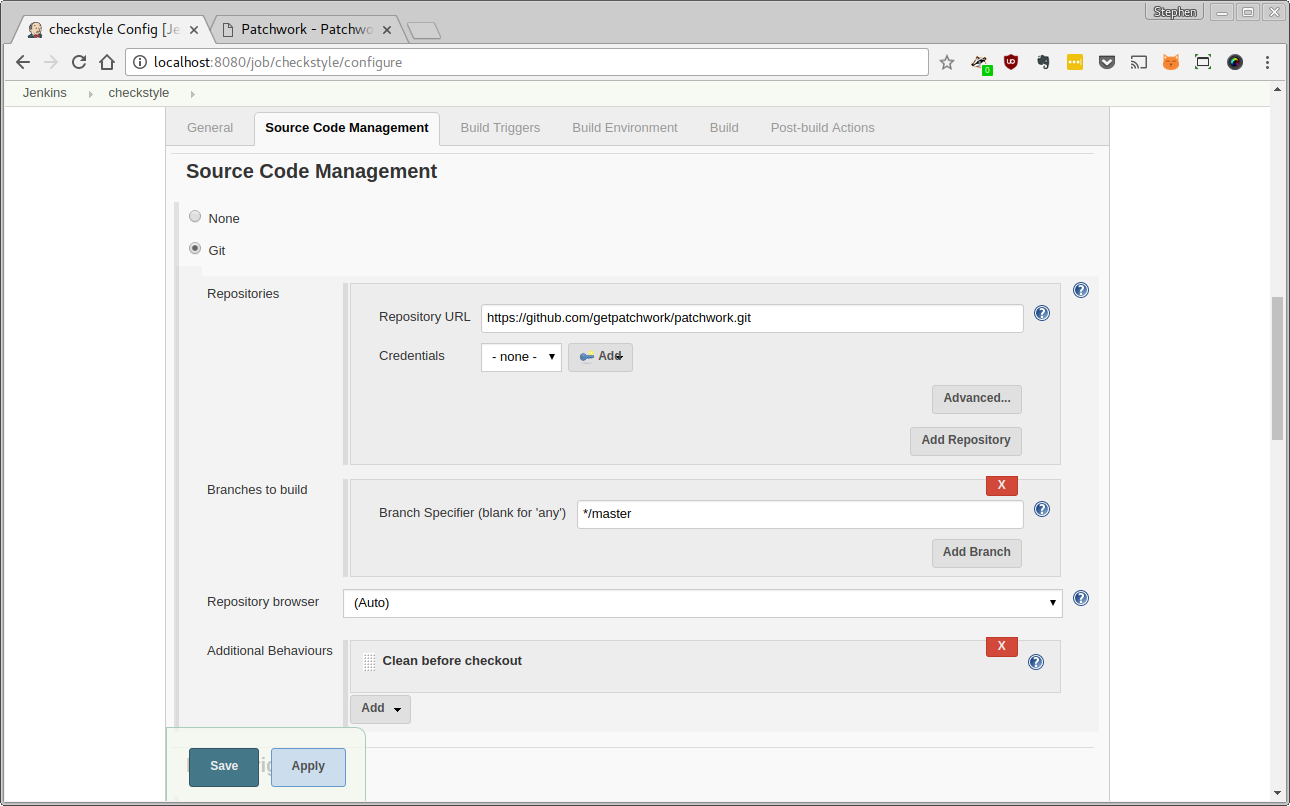
Source Code Management
For the Build Triggers section, we’re going to trigger this remotely using
another script. Simply tick the relevant box and set an “authentication token”.
Use hello-world as a token.
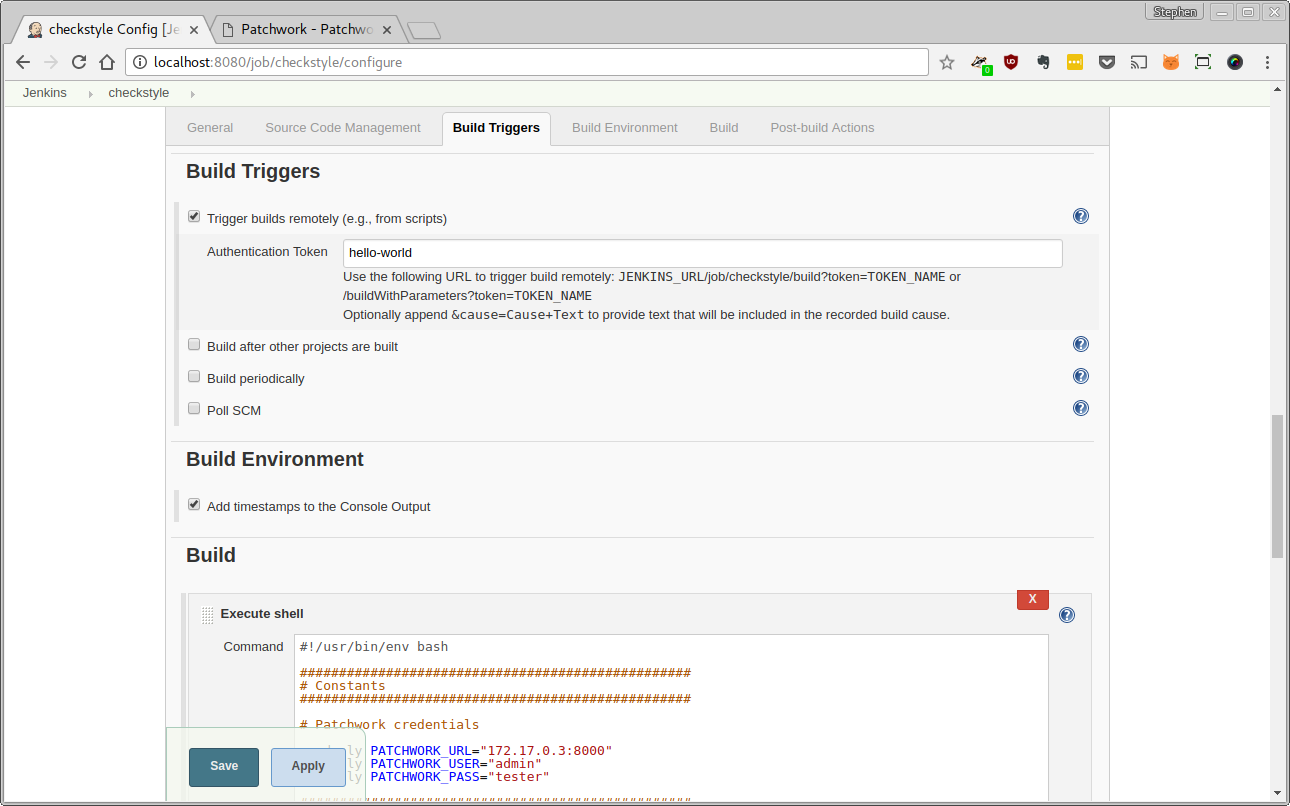
Build Triggers
The Build Environment section can be mostly ignored. Simply enable timestamps in the build output.
Build Environment
Now for the juicy bit: Build. You’ll want to execute four steps:
-
Tell Patchwork (via the API) that we’re kicking off the build
-
Download and apply the patch
-
Run the test(s)
-
Report the end result to Patchwork (again, via the API)
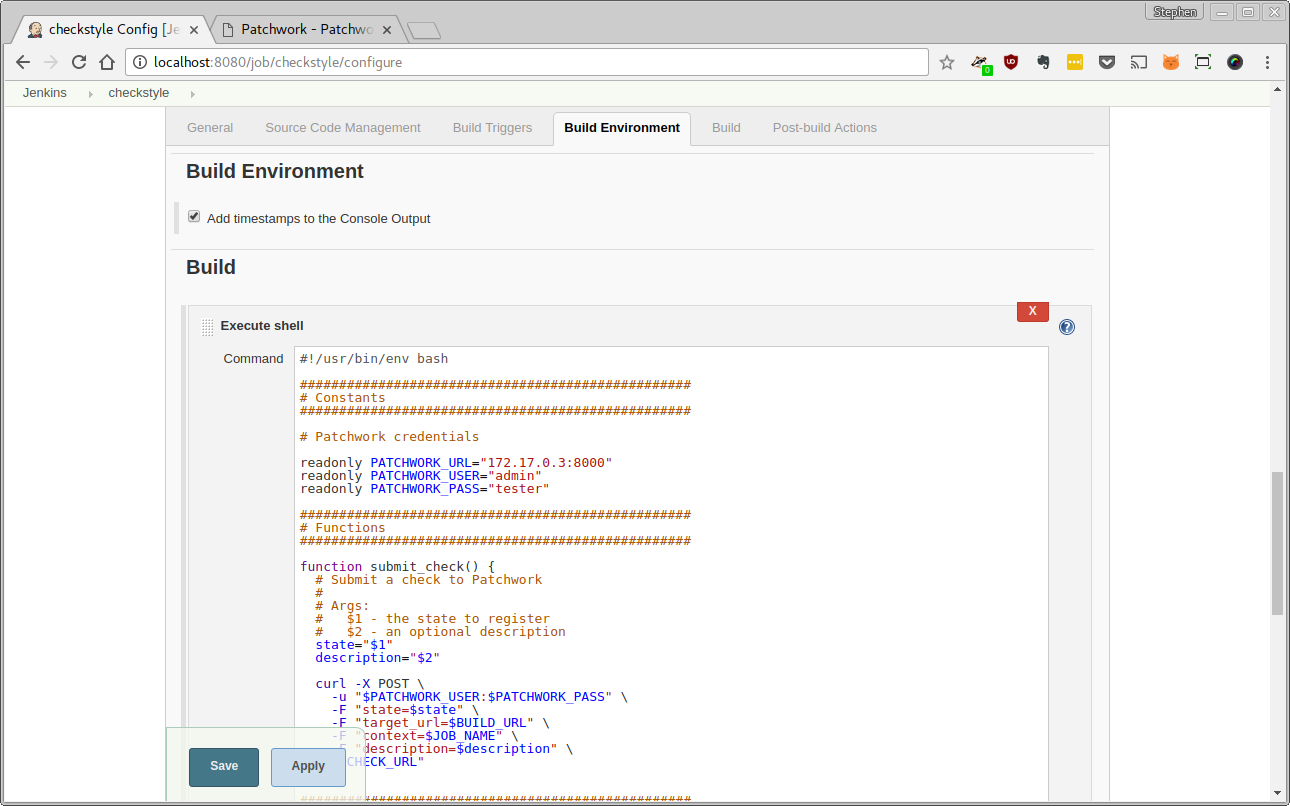
A script provided below will do the job for you. This script will use the username, password and IP address of the Patchwork instance, which we got previously. Add a new “Execute Shell” build step to the Build section. Paste the script provided below there, updating the IP address or credentials where necessary:
#!/usr/bin/env bash

##################################################
# Constants
##################################################

# Patchwork credentials

readonly PATCHWORK_URL="172.17.0.3:8000"
readonly PATCHWORK_USER="admin"
readonly PATCHWORK_PASS="tester"

##################################################
# Functions
##################################################

function submit_check() {
  # Submit a check to Patchwork
  #
  # Args:
  #   $1 - the state to register
  #   $2 - an optional description
  state="$1"
  description="$2"

  curl -X POST \
    -u "$PATCHWORK_USER:$PATCHWORK_PASS" \
    -F "state=$state" \
    -F "target_url=$BUILD_URL" \
    -F "context=$JOB_NAME" \
    -F "description=$description" \
    "$CHECK_URL"
}

##################################################
# Main
##################################################

# Sanity checks

echo "MBOX_URL=$MBOX_URL"
echo "CHECK_URL=$CHECK_URL"
echo "JOB_NAME=$JOB_NAME"
echo "BUILD_URL=$BUILD_URL"

# Notify the user that the build is starting
submit_check "pending"

# Navigate to the Patchwork directory
cd patchwork || exit

# Configure fake git credentials so we can use git-am
git config user.name 'John Doe'
git config user.email '[email protected]'

# Simply download and apply the mbox to ensure it still applies
if ! curl "$MBOX_URL" | git am -3; then
  submit_check "fail"
  exit 1
else
  submit_check "success"
  exit 0
fi
You’ll notice we’re really not taking advantage of Jenkins’ power here but bear with me: these are baby steps.
Once done, you should have something like the following:
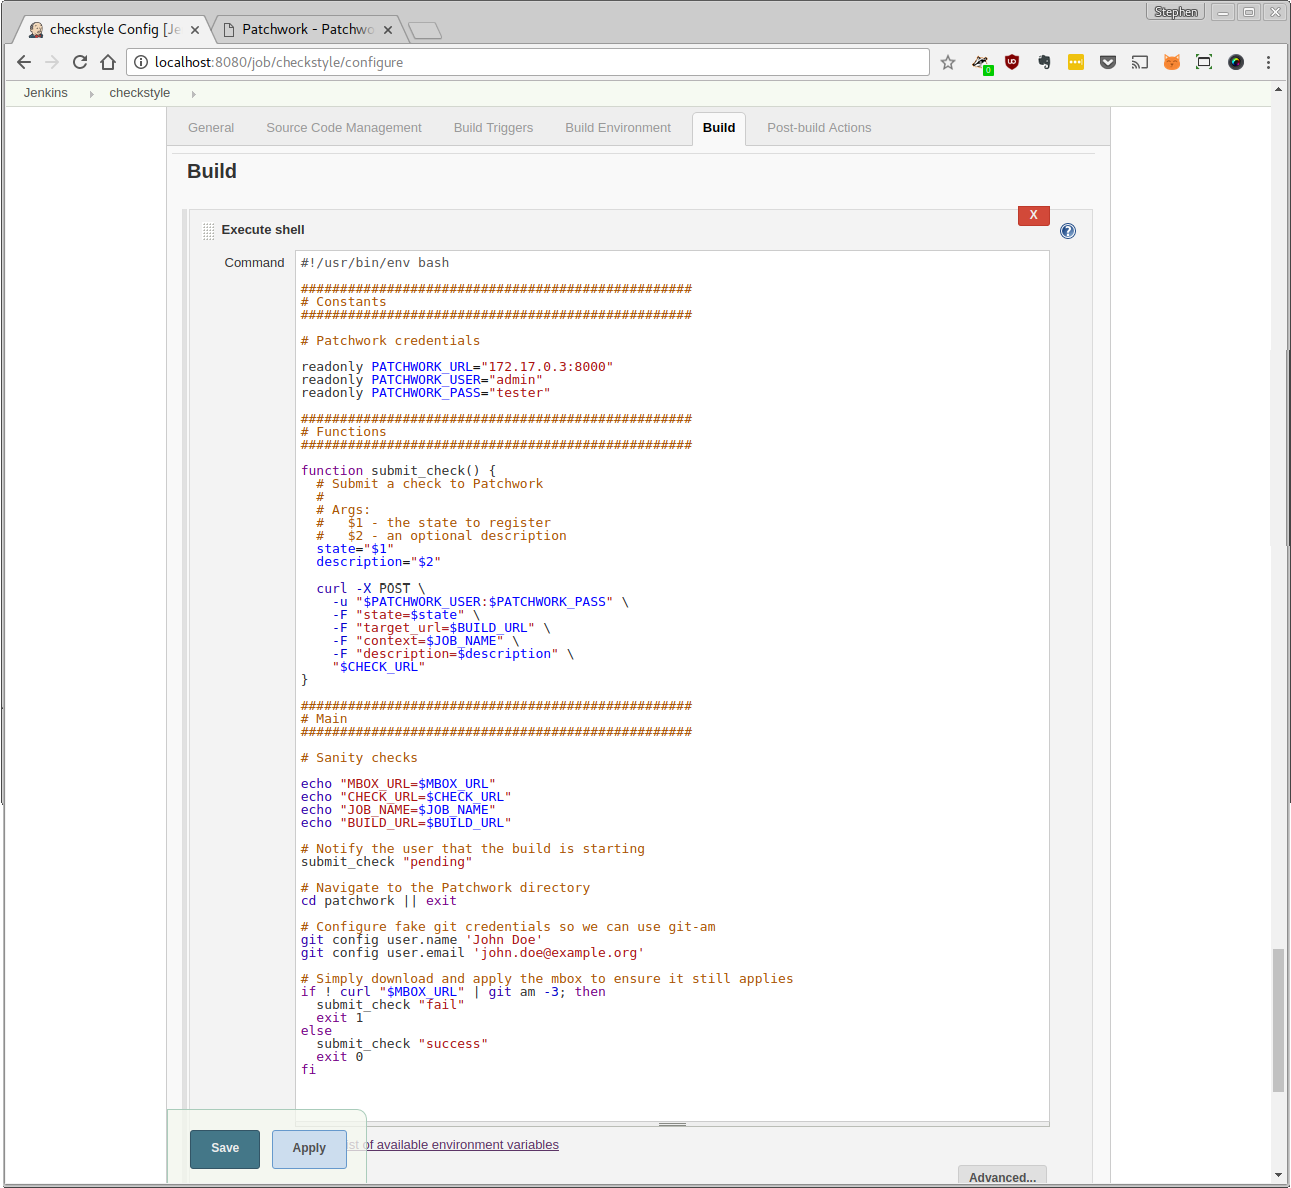
Build
Finally, the Post-build Actions. I didn’t make use of this section, though I’m sure the above script could be broken up to make use of this. Some other time, perhaps.
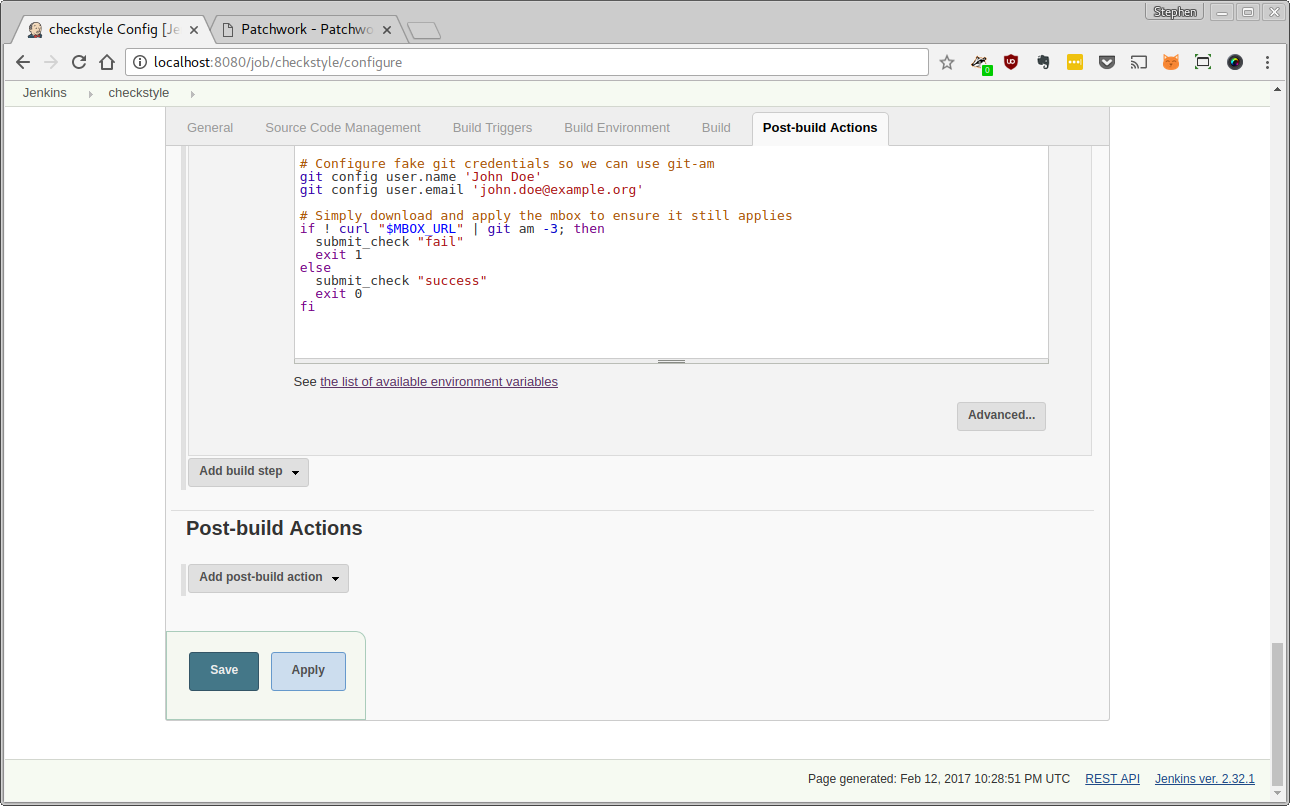
Post-build Actions
Summary
Once this step is complete, you should have configured a basic Jenkins job that can be kicked off using the API. This job uses the credentials and IP of the Patchwork instance. You’ll also have a token for your Jenkins user, which we will use to talk to the Jenkins API.
Poll Patchwork and Kick of Jenkins Builds
We’re going to use a rather simple Bash script to kick of the Jenkins build. We could do the exact same thing in Python (it would likely be more robust), but Bash makes for a good first pass. The script consists of a number of different parts: all should be combined to produce the final scripts.
Note that the below script(s) makes use of the jq tool to parse JSON. This is
not part of the default install on many distros, and may need to be installed
manually. You should do this now. For example, on Fedora 25 run:
$ sudo dnf install jq
First up in the script: Jenkins and Patchwork credentials. We’re going to hard-code these for now, using the Jenkins username and token and Patchwork username and password we configured/collected earlier. We’re also going to create some function stubs, which we will populate later.
##################################################
# Constants
##################################################

# Patchwork credentials

readonly PATCHWORK_URL="172.17.0.3:8000"
readonly PATCHWORK_USER="admin"
readonly PATCHWORK_PASS="tester"

# Jenkins credentials

readonly JENKINS_URL="localhost:8080"
readonly JENKINS_USER="admin"
readonly JENKINS_TOKEN="962ccd82ce467804ec7e465602381d12"
readonly JENKINS_CRUMB=$(curl -s "http://${JENKINS_USER}:${JENKINS_TOKEN}@${JENKINS_URL}/crumbIssuer/api/xml?xpath=concat(//crumbRequestField,\":\",//crumb)")

# Job configuration

readonly JOB_NAME="checkstyle"
readonly JOB_TOKEN="hello-world"

##################################################
# Functions
##################################################

function submit_job() {
  # TODO
}
Note that Jenkins requires that you supply a “crumb” with all requests to prevent CSRF, so we gather that now. More information is provided in this StackOverflow question and in the remote access API wiki.
Next, the polling of /events. This is an endpoint in the Patchwork REST API
that reports events related to elements like patches, series or checks. A list
of all supported events is provided in the docs but there are two that we
care about here: patch-created and patch-complete. Per the docs, the first
of these occurs when a patch is added to Patchwork. The second, meanwhile,
occurs when all dependencies (if any) are met. This means that if a two patch
series is sent to Patchwork and the second patch is received first, only the
patch-created event will be created for this patch. Only when the first patch
in that series (the second patch’s only dependency) is received will the
patch-completed be raised for the second patch (the patch-created and
patch-completed events will be raised at the same time for the first patch,
given that it has no dependencies per se).
The below section of the script deals with reading these events from the Patchwork API.
##################################################
# Main
##################################################

# Pull in latest events

response=$(curl -s -u "$PATCHWORK_USER:$PATCHWORK_PASS" \
  -H "Host: $PATCHWORK_URL \
  http://${PATCHWORK_URL}/api/1.0/events/?category=patch-completed)
Note: The use of the Host: header is important - without this, responses
will be returned using localhost as the host name. This won’t be usable from
another container.
The response from the /events API will include links to the created patch
and, for the patch-completed event, the patch series which is providing the
dependencies. We must retrieve the patch and series from the Patchwork API.
Note that, in a future version of the API, we should support an embed
parameter that would allow us to embed the patch and series in the response and
avoid these additional requests.
# Extract patch and series URLs from each event, and create jobs based on
# these

patches_series=$(echo "$response" | jq -rc '.[] | .payload.patch.url + "," + .payload.series.id')
echo "$patches_series" | while IFS=, read -r patch series; do
  echo "Submitting job"
  echo "Patch URL: $patch"
  echo "Series ID: $series"

  submit_job "$patch" "$series"
done
Once we have the patch_url and series_id, we can submit the job to Jenkins.
We’re going to do this via a call to the submit_job function, which we
already defined a stub for. Implementing this function is rather simple, given
that we have already configured the job and gathered all required parameters
and credentials. Replace the above stub with the below function.
function submit_job() {
  local patch_url
  local series_id
  local mbox_url
  local build_url

  patch=$(curl "$1")
  series_id="$2"

  mbox_url="$(echo $patch | jq -rc '.mbox')?series=$series_id"
  check_url="$(echo $patch | jq -rc '.checks')"
  build_url="http://$JENKINS_USER:$JENKINS_TOKEN@$JENKINS_URL/job/$JOB_NAME/build"

  echo "Submitting job: $build_url"
  echo "Job parameters: PATCH_MBOX_URL=$mbox_url, CHECK_URL=$check_url"

  curl -X POST \
    -H "$JENKINS_CRUMB" \
    --data token="$JOB_TOKEN" \
    --data-urlencode json='{
      "parameter": [
        {"name":"MBOX_URL", "value":"'"$mbox_url"'"},
        {"name":"CHECK_URL", "value":"'"$check_url"'"}
      ]
    }' \
    "$build_url"

  echo "Job submitted"
}
There are a two important points to note related to how the Jenkins API works:
-
The Jenkins API requires parameters be passed via a JSON body rather than than individual fields. This differs from Patchwork.
-
The Jenkins API requires the inclusion of a crumb header, by way of the
JENKINS_CRUMBthat we stored earlier. This is intended to prevent CSRF attacks.
More information on the Jenkins API can be found in remote access API wiki.
Add Patches to Patchwork
Once done, it’s time to load in some patches. In practice, this would happen automatically but, as this is for testing only, we’re going to once again follow the Patchwork documentation and make use Mailman archives. I downloaded the archives for January 2017, like so:
$ curl https://gist.github.com/stephenfin/d13183dad40f8c472234cb26777355c3 \
    | gunzip > sample-series.mbox
Note that this must be downloaded to the patchwork directory, else it will
not be accessible from the Docker containers.
Once downloaded, use the parsearchive tool provided with Patchwork to load
the archive:
$ docker-compose run web python manage.py parsearchive \
    --list-id=patchwork.ozlabs.org \
    sample-series.mbox
Keep an eye on the /events URL - you should notice a few new patch events.
Go Time
Run the script on your host and watch the end result. That script will read the events stream, filter the events we care about, and kick of Jenkins builds for the patches you just added. Jenkins will then take over, reporting that it is starting testing to Patchwork, actually running the tests, then reporting the end result to Patchwork. You should be able to see the jobs running in Jenkins, and the resulting checks reported in the API.
http://localhost:8080/job/checkstyle/
http://localhost:8000/api/1.0/events/?category=patch-completed
Summary
And so completes our demo. It’s rather basic, involving a lot of “shortcuts” and tinkering. However, it does demonstrate the coming together of many of the features available in the next version of Patchwork, namely:
-
Checks, available in Patchwork 1.1
-
REST API, available in Patchwork 2.0
-
Series, available in Patchwork 2.0
-
Events, available in Patchwork 2.0
Not all of these features are required for building an automated testing
system. For example, if you didn’t want to test series or were happy testing
individual patches, you could skip the series support. Likewise, you don’t have
to report test results to Patchwork and could poll the /patches or /series
endpoints instead of the /events endpoint to find patches to test. In my
opinion though, this represents a great starting point for building an
sustainable, stable, and ultimately beneficial testing infrastructure for
projects using a mailing list workflow.
What’s Next
-
A better permissions model for Patchwork users
-
ETag support, allowing us to minimize requests to the API
-
Better upstream documentation