
One of the goals for an upcoming OpenShift release is to formally support MetalLB and the MetalLB operator on the OpenStack platform. While MetalLB is mainly targeted at bare metal deployments, it also has value on some on-prem platforms such as OpenStack; for example, if you can’t or don’t want to deploy the OpenStack Load Balancing service (Octavia). I’ve been investigating how this would work and this post consists of my testing notes, along with some asides to help flesh things out. I took a few shortcuts, particularly when it comes to initial deployment, so I don’t know how broadly useful this will be. However, there are very few blogs talking about MetalLB in BGP mode on OpenStack so I imagine there’s something of use here.
One thing to note from the get-go is that this focuses on using MetalLB as a load balancer for applications or data
plane - that is, Service instances with type=LoadBalancer. Like OpenShift on bare metal, OpenShift on OpenStack uses
keepalived and HAProxy to load balance the API and ingress VIPs (which you can see in action by inspecting the pods
in openshift-openstack-infra namespace). There are no current plans to provide a mechanism for using MetalLB to load
balance the control plane.
This is the first part of two and focuses on deploying OpenStack, configuring a BGP environment, before deploying an OpenShift cluster. The end result should look something like this:
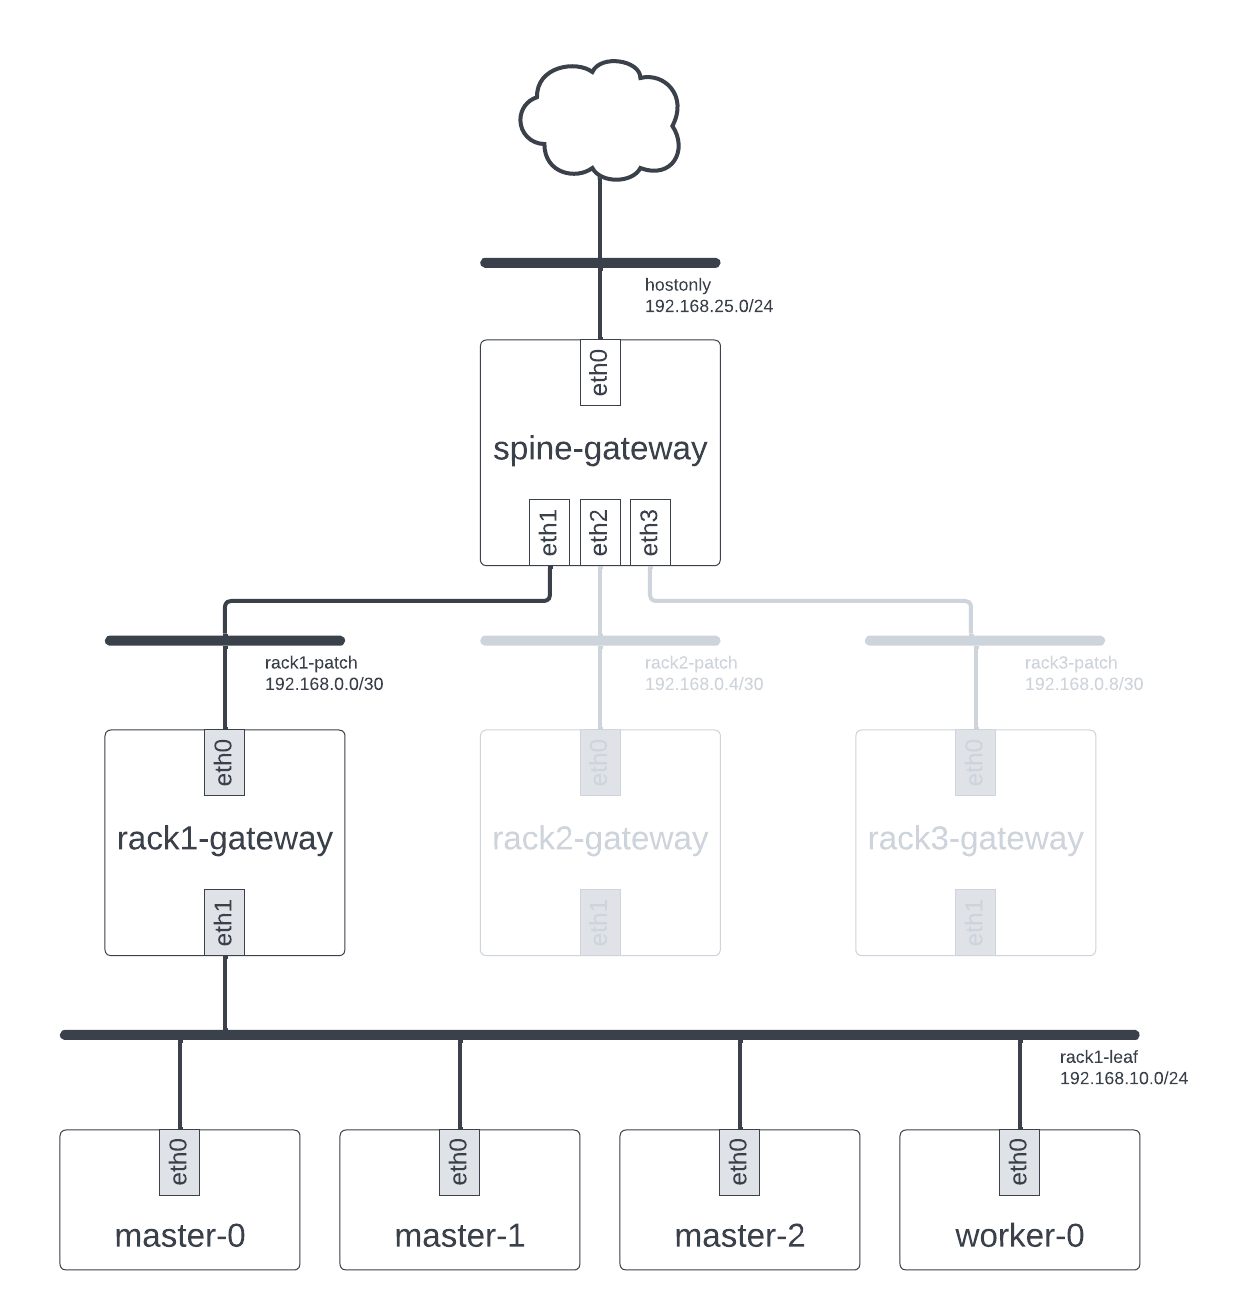
Our proposed deployment
This is likely the most involved section to do from scratch owing to the variety and varying complexity of options available for configuring OpenStack, BGP, and OpenShift. It is also heavily dependent on the hardware you have available to you. As a result, you may wish to ignore this part entirely and figure out your own mechanism for getting an environment that looks like the above.
OpenStack
Before we even start thinking about OpenShift, we need our OpenStack platform to run things on. You may well have an OpenStack platform already, in which case you can skip this section entirely. Similarly, you may have a preferred tool or workflow for deploying OpenStack clusters, meaning again you can skip this section entirely and do your own thing. The important thing is that whatever environment you have must have enough capacity to run 4 small instances for BGP routing (a flavour with 1GB RAM, 1 vCPU, and 10GB disk will suffice) and 4 much larger instances for OpenShift nodes (16GB RAM, 4 vCPU and 40GB disk minimum).
In my case, I was deploying OpenStack from scratch onto a single beefy bare metal machine (A Dell PowerEdge R640 with 2 Intel Xeon Silver 4216 CPUs, 192 GB RAM and 512GB SSD + 2TB HDD). To do so, I used github.com/shiftstack/dev-install, an opinionated wrapper around TripleO Standalone designed for hosting OpenShift clusters, to deploy an OSP 16.2 cloud (OpenStack Train). dev-install is available on GitHub:
❯ git clone https://github.com/shiftstack/dev-install
❯ cd dev-install
Using dev-install is relatively easy: all it needs is a local_overrides.yaml file that contains information about
the IP address and hostname of the server, the OSP release you wish to use, and any other overrides necessary. I didn’t
need anything special so there were no overrides in my case. This meant my local_overrides.yaml file looked something
like this:
hostname: acme
public_api: 10.1.240.35
standalone_host: acme.shiftstack.test
rhos_release: 16.2
clouddomain: shiftstack.test
With the local_overrides.yaml file in place, you can kick off installation:
❯ make config host=acme.shiftstack.test
❯ make osp_full overrides=local_overrides.yaml
Installation should take about 30 minutes and two new entries, standalone and standalone_openshift, will be added to
your clouds.yaml file upon completion.
Once installation is completed, there is one final step necessary: starting sshuttle. dev-install creates a
hostonly network that is not routable outside the host. As a result, you need something to proxy requests for the
associated hostonly-subnet subnet to the host and dev-install opts to use sshuttle for this. You can start
sshuttle using the wrapper script provided:
❯ ./scripts/sshuttle-standalone.sh
BGP
Next, we need to configure a BGP environment. I didn’t have access to some ToR switches with BGP support so we
opted to emulate it using frr, a software routing solution. To do this, I used
github.com/shiftstack/poc-bgp, a set of Ansible playbooks which deployed four instances on my new OpenStack
cloud: a spine router instance and three leaf router instances. Once again, there are other software routing solutions
available and you might even have access to real hardware, so if you opt for another approach you could obviously skip
this section (though if you do, you will likely need to modify your MetalLB configuration when we get to that step in
the next post). Assuming you opt to use poc-bgp, you’ll need a CentOS 9 Stream image to exist on the cloud as well as
a key pair so that you can SSH into the instances it creates. You can create the image like so:
❯ wget https://cloud.centos.org/centos/9-stream/x86_64/images/CentOS-Stream-GenericCloud-9-20230417.0.x86_64.qcow2
❯ openstack image create --public --disk-format qcow2 --file CentOS-Stream-GenericCloud-9-20230417.0.x86_64.qcow2 centos9-stream
Similarly, you can create the key pair like so:
❯ openstack keypair create --public-key ~/.ssh/id_ed25519.pub default
Once these resources exists, configuration and deployment is otherwise relatively uncomplex.
❯ git clone https://github.com/shiftstack/poc-bgp
❯ cd poc-bgp
❯ cat << EOF > localvars.yaml
cloud_name: standalone_openshift
image: centos9-stream
instance_name: stephenfin-poc-bgp
external_network: hostonly
keypair: default
dns_nameservers: 1.1.1.1
flavor: m1.tiny
EOF
❯ make deploy
Once deployed you will end up with 4 instances and 7 networks (6 plus the hostonly network):
❯ openstack server list
+--------------------------------------+----------------------------------+--------+----------------------------------------------------------------------------------------------------------------------------------------------------------------------------+----------------+-----------+
| ID                                   | Name                             | Status | Networks                                                                                                                                                                   | Image          | Flavor    |
+--------------------------------------+----------------------------------+--------+----------------------------------------------------------------------------------------------------------------------------------------------------------------------------+----------------+-----------+
| a3375961-0821-4135-b064-b884460d11c2 | stephenfin-poc-bgp-spine-gateway | ACTIVE | hostonly=192.168.25.191, 2001:db8::100; stephenfin-poc-bgp-rack1-patch=192.168.0.1; stephenfin-poc-bgp-rack2-patch=192.168.0.5; stephenfin-poc-bgp-rack3-patch=192.168.0.9 | centos9-stream | m1.tiny   |
| f1e3b324-bf60-440e-808a-3e548f571f1a | stephenfin-poc-bgp-rack1-gateway | ACTIVE | stephenfin-poc-bgp-rack1-leaf=192.168.10.1; stephenfin-poc-bgp-rack1-patch=192.168.0.2                                                                                     | centos9-stream | m1.tiny   |
| 2b6051cb-f98a-4112-8096-c5c96c56f05a | stephenfin-poc-bgp-rack2-gateway | ACTIVE | stephenfin-poc-bgp-rack2-leaf=192.168.20.1; stephenfin-poc-bgp-rack2-patch=192.168.0.6                                                                                     | centos9-stream | m1.tiny   |
| 2d14cda5-377a-4383-b6e8-feb50455fad0 | stephenfin-poc-bgp-rack3-gateway | ACTIVE | stephenfin-poc-bgp-rack3-leaf=192.168.30.1; stephenfin-poc-bgp-rack3-patch=192.168.0.10                                                                                    | centos9-stream | m1.tiny   |
+--------------------------------------+----------------------------------+--------+----------------------------------------------------------------------------------------------------------------------------------------------------------------------------+----------------+-----------+

❯ openstack network list
+--------------------------------------+--------------------------------+----------------------------------------------------------------------------+
| ID                                   | Name                           | Subnets                                                                    |
+--------------------------------------+--------------------------------+----------------------------------------------------------------------------+
| 19708577-3757-4956-903e-9656229e1286 | stephenfin-poc-bgp-rack1-leaf  | 6152b856-781b-4fc9-9979-e4cfc9e282b8                                       |
| 2a28f908-e9ec-4fb5-a4cb-09cd5dae8723 | stephenfin-poc-bgp-rack3-patch | 0f15d6ed-0b8a-435e-90d0-83edb2164100                                       |
| 2cd308e3-8370-425b-af1c-0ce5562c2b36 | stephenfin-poc-bgp-rack1-patch | f22c9d7e-9c7f-4985-be7c-63eb05014544                                       |
| 3060e6b0-c2c3-4f59-ac13-9d07a7a963f1 | stephenfin-poc-bgp-rack2-leaf  | 824cfd85-f89b-4a07-a330-3c3adb55b0e3                                       |
| 538a2436-07c5-48f1-8cd0-39931244bcb7 | stephenfin-poc-bgp-rack3-leaf  | 3109bff8-fdd5-4824-ab2d-58184096e35c                                       |
| 91efea92-eaf8-4146-ac4c-48d3edfedfe4 | hostonly                       | 607ba284-3762-4667-a2fa-2a7f31de6f35, b147f959-3122-4ad9-aaaa-6ff1af41c8df |
| b15da053-0625-4d33-ad6a-036dd76cfc8d | stephenfin-poc-bgp-rack2-patch | 71a6eeef-2c3d-45e2-80a9-efff6e15a289                                       |
+--------------------------------------+--------------------------------+----------------------------------------------------------------------------+
The spine-gateway instance is connected to the three rackN-gateway instances via separate patch networks, while the
three rackN-gateway instances have their own rackN-leaf leaf network. We’re going to use one of the latter as our
machine subnet when installing OpenShift shortly.
We have some final steps to do here. First, we need to configure the subnets created by poc-bgp to keep IP address
< .10 free. This is necessary because we are going to use some of these IP addresses for OpenShift VIPs shortly.
❯ openstack subnet set --no-allocation-pool --allocation-pool "start=192.168.10.10,end=192.168.10.239" stephenfin-poc-bgp-rack1-subnet
❯ openstack subnet set --no-allocation-pool --allocation-pool "start=192.168.20.10,end=192.168.20.239" stephenfin-poc-bgp-rack2-subnet
❯ openstack subnet set --no-allocation-pool --allocation-pool "start=192.168.30.10,end=192.168.30.239" stephenfin-poc-bgp-rack3-subnet
In addition, we need another instance of sshuttle to configure traffic for these new networks to route through the
spine-gateway host. This will look something like so:
❯ sshuttle -r cloud-user@${GATEWAY_HOST_IP} 192.168.10.0/24 192.168.20.0/24 192.168.30.0/24
where ${GATEWAY_HOST_IP} is the IP of the spine-gateway host (192.168.25.191 in my case).
With our BGP routers in place, we can move onto the final stage of set up: installing OpenShift.
OpenShift
The last step of initial set up is installing OpenShift. I used openshift-install to do this, deploying a 4.12
OpenShift cluster on my OpenStack cloud. When deploying OpenShift, you’ll want to pay special attention to the
networking configuration. As noted above, we want to use one of the rackN-leaf networks and I chose rack1-leaf
arbitrarily. You should use IPs from whatever subnet you choose for your API and Ingress VIPs, picking address in the
< .10 range we previously set aside. This means you should end up with configuration similar to the following in
your install-config.yaml:
---
# ...
platform:
  openstack:
    # ...
    machinesSubnet: 6152b856-781b-4fc9-9979-e4cfc9e282b8  # stephenfin-poc-bgp-rack1-subnet
    apiVIPs:
      - 192.168.10.5  # from stephenfin-poc-bgp-rack1-subnet, < .10
    ingressVIPs:
      - 192.168.10.7  # from stephenfin-poc-bgp-rack1-subnet, < .10
networking:
  clusterNetworks:
    - cidr: 10.128.0.0/14
      hostSubnetLength: 9
  serviceCIDR: 172.30.0.0/16
  machineNetwork:
    - cidr: 192.168.10.0/24
    - cidr: 192.168.25.0/24
In addition, assuming you don’t have a local DNS server configured, you will need to modify your /etc/hosts file to
specify the hostnames and corresponding IP addresses of your OpenShift cluster. This is described in the
OpenShift Installer docs, but in summary you’ll want something like this:
# openshift shiftstack nodes
192.168.10.5 api.stephenfin.openshift.shiftstack.test
192.168.10.7 console-openshift-console.apps.stephenfin.openshift.shiftstack.test
192.168.10.7 integrated-oauth-server-openshift-authentication.apps.stephenfin.openshift.shiftstack.test
192.168.10.7 oauth-openshift.apps.stephenfin.openshift.shiftstack.test
192.168.10.7 prometheus-k8s-openshift-monitoring.apps.stephenfin.openshift.shiftstack.test
192.168.10.7 grafana-openshift-monitoring.apps.stephenfin.openshift.shiftstack.test
# End of openshift nodes
You should obviously change the hostnames and IP addresses to match whatever you configured in your
install-config.yaml file.
Once you have these steps completed, you can kick of installation:
openshift-install --log-level debug create cluster
Wait for that to complete, at which point you should have a fully functioning OpenShift deployment that you can interact
with using oc or kubectl.
Wrap Up
In this post, we deployed an OpenStack deployment, configured BGP software routers, and deployed OpenShift on OpenStack. In the next post, we will work to install MetalLB itself. Stay tuned.
Appendix: Configuration files
Here are the full configuration files used for my deployment.
dev-install
local-overrides.yaml:
hostname: acme
public_api: 10.1.240.35
standalone_host: acme.shiftstack.test
rhos_release: 16.2
clouddomain: shiftstack.test
poc-bgp
local_vars.yaml:
cloud_name: standalone_openshift
image: centos9-stream
instance_name: stephenfin-poc-bgp
external_network: hostonly
keypair: default
dns_nameservers: 1.1.1.1
flavor: m1.tiny
openshift-installer
install-config.yaml:
---
apiVersion: v1
baseDomain: openshift.shiftstack.test
metadata:
  name: stephenfin
controlPlane:
  name: master
  platform:
    openstack:
      type: m1.xlarge
  replicas: 3
compute:
  - name: worker
    platform:
      openstack:
        type: m1.xlarge
    replicas: 1
platform:
  openstack:
    defaultMachinePlatform:
      type: m1.xlarge
    clusterOSImage: rhcos-4.12
    cloud: standalone_openshift
    machinesSubnet: 6152b856-781b-4fc9-9979-e4cfc9e282b8
    apiVIPs:
      - 192.168.10.5
    ingressVIPs:
      - 192.168.10.7
networking:
  clusterNetworks:
    - cidr: 10.128.0.0/14
      hostSubnetLength: 9
  serviceCIDR: 172.30.0.0/16
  machineNetwork:
    - cidr: 192.168.10.0/24
    - cidr: 192.168.25.0/24
pullSecret: <redacted>