
As noted previously, one of the goals for an upcoming OpenShift release is to formally support MetalLB and the MetalLB operator on the OpenStack platform. In part one of the series, we configured an environment with OpenStack, OpenShift and BGP software routers. Now, in part two, we’re going to focus on installing and configuring MetalLB itself.
Install MetalLB
The first step on the path to using MetalLB is actually installing it. As a reminder, we want to use MetalLB in BGP mode. This necessitates things like routers that speak BGP and an OpenStack deployment that is configured to talk to these routers. These were all discussed in part one of this series, and if you followed along with this then you will currently have a deployment that looks like this:
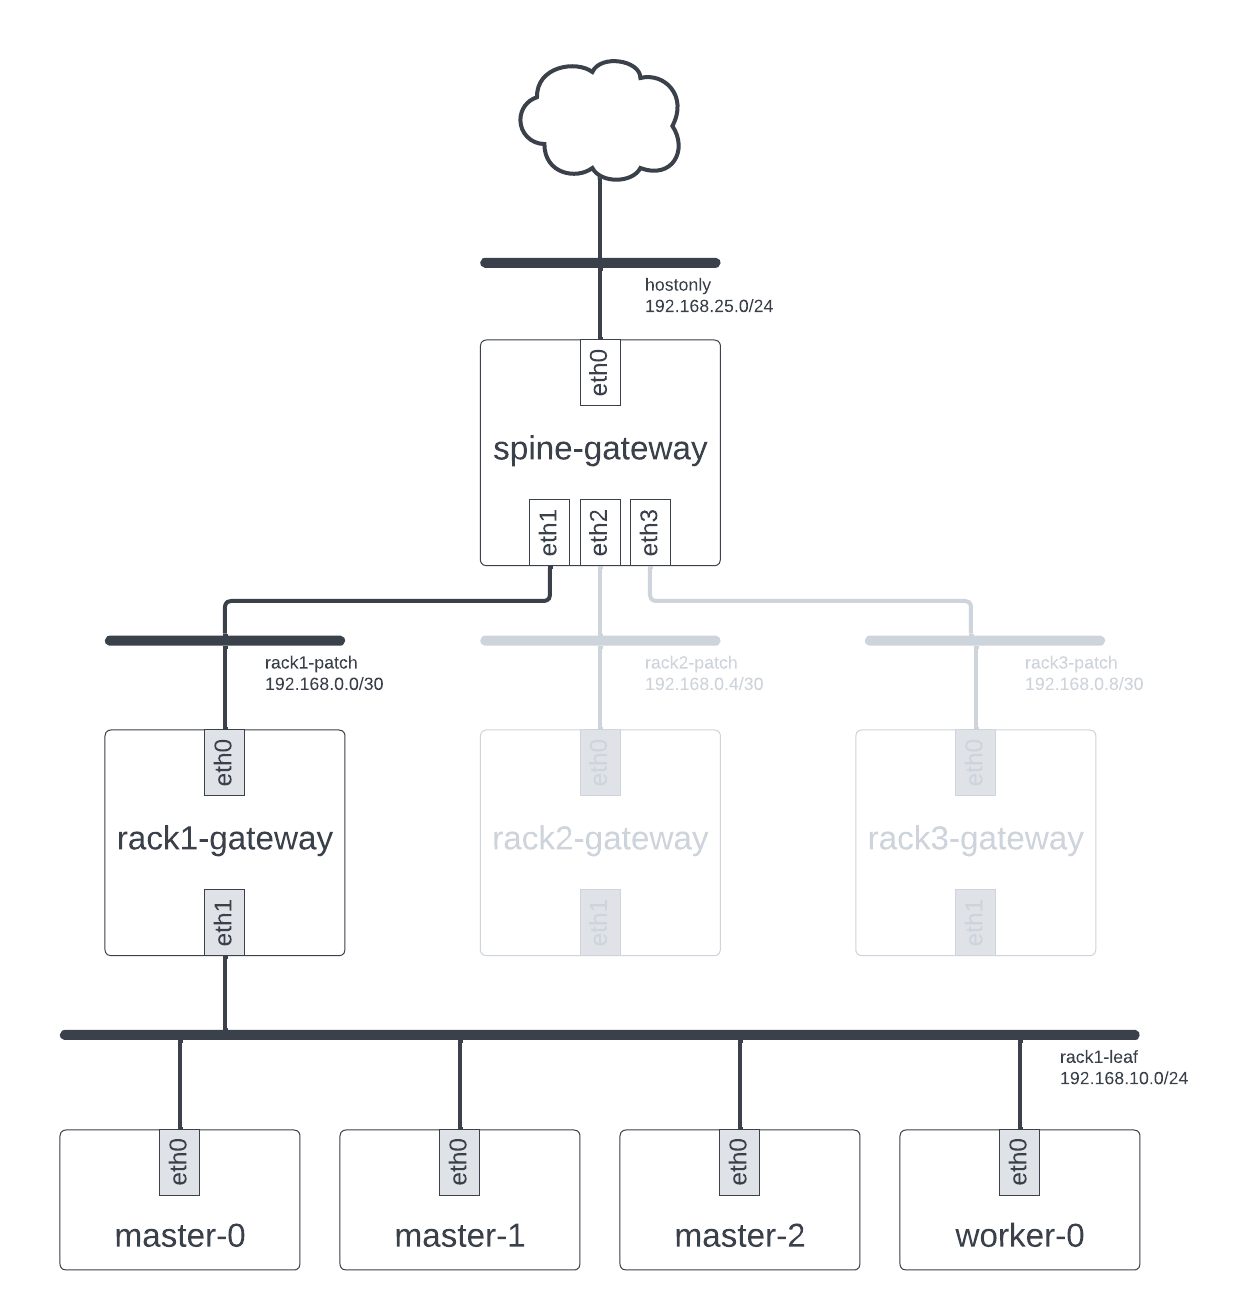
Our deployment configured
If this is not the case, you probably want to read that part first. However, assuming it is, we can now proceed with installation. As a Kubernetes-native project, MetalLB comes with all the usual mechanisms for installation of Kubernetes components. Plain manifests are provided, as are Helm Charts and an operator, the MetalLB Operator. The various installation mechanisms are all discussed in the MetalLB installation guide.
Because operators are awesome, I opted to use the MetalLB Operator to deploy MetalLB and manage its lifecycle. The
MetalLB Operator is available on OperatorHub at operatorhub.io/operator/metallb-operator but when I was testing, the
main branch contained a feature I wanted, namely the ability to configure a loadBalancerClass. As a
result, I opted to deploy MetalLB Operator from source. The MetalLB Operator provides a very helpful Make target to do
this, which you can use:
❯ git clone https://github.com/metallb/metallb-operator
❯ cd metallb-operator
❯ make deploy-openshift
Deployment takes a while but once finished we can validate that everything is running:
❯ oc get all -n metallb-system
Installation complete! Now onto configuration.
Initial MetalLB configuration
With the MetalLB Operator installed, it’s time to configure MetalLB. By using MetalLB Operator we gain the ability to
manage configuration of MetalLB itself via CRs. First up is the MetalLB CR. This is primary configuration mechanism
and is the thing that enables MetalLB itself. There should only be one of them, which you can create like so:
❯ cat << EOF | oc apply -f -
apiVersion: metallb.io/v1beta1
kind: MetalLB
metadata:
    name: metallb
    namespace: metallb-system
spec:
    loadBalancerClass: 'metallb.universe.tf/metallb'
    nodeSelector:
        kubernetes.io/os: linux
        node-role.kubernetes.io/worker: ""
EOF
There are a couple of things to note here. Firstly, we are configuring spec.loadBalancerClass. This is necessary
because dev-install deploys Octavia by default and cloud-provider-openstack is using this for load balancing by
default. By setting this, we have the ability to later configure Services to use MetalLB rather than Octavia.
Secondly, we are restricting the speakers to run on worker nodes by configuring spec.nodeSelector as there’s simply no
need to run them on the master nodes.
Once the CR is created, we can validate that it exists:
❯ oc get -n metallb-system metallb metallb
Assuming so, you can ensure the loadBalancerClass attribute is in effect by inspecting the underlying service
containers:
❯ oc get -n metallb-system pods
NAME                                                  READY   STATUS    RESTARTS      AGE
controller-7df7bbcffb-8cqzb                           1/1     Running   0             5m1s
metallb-operator-controller-manager-c44c967b9-l6rvx   1/1     Running   0             13h
metallb-operator-webhook-server-6fdccfb5c5-k8b2m      1/1     Running   1 (13h ago)   13h
speaker-bg6pq                                         4/4     Running   0             5m1s
speaker-q6dmg                                         4/4     Running   0             5m1s
speaker-sjmtc                                         4/4     Running   0             5m1s
speaker-z9zrr                                         4/4     Running   0             5m1s
❯ oc get -n metallb-system pod controller-7df7bbcffb-8cqzb -o jsonpath="{.spec.containers[0].args}" | yq -P
- --port=7472
- --log-level=info
- --cert-service-name=webhook-service
- --lb-class=metallb.universe.tf/metallb
- --webhook-mode=disabled
❯ oc get -n metallb-system pod speaker-bg6pq -o jsonpath="{.spec.containers[0].args}" | yq -P
- --port=7472
- --log-level=info
- --lb-class=metallb.universe.tf/metallb
This all looks good. With this, the initial configuration of MetalLB is also complete. Now to the next step: configuring MetalLB for our BGP environment.
Configuring MetalLB to talk to the router
MetalLB in BGP mode requires a few bits of information. It needs a list of IP addresses that it can hand out, it needs
information about the routers that it should peer with, and it needs to be told which IP addresses it can advertise via
BGP. This configuration is all done using CRs, namely the IPAddressPool, BGPPeer, and BGPAdvertisement CRs. First
up, the IP address pools.
cat << EOF | oc apply -f -
apiVersion: metallb.io/v1beta1
kind: IPAddressPool
metadata:
  namespace: metallb-system
  name: ipaddresspool
spec:
  addresses:
    - 192.168.50.1-192.168.50.254
EOF
I’ve picked a totally arbitrary IP address range, ensuring it doesn’t overlap with any other IP address range on the network. Obviously if you have specific IP addresses you wish to use, you should configure these instead. I’ve also only configured one. This should be loads for our purposes.
Next, the BGP peers. While we have multiple leaf routers, our master and worker nodes are all talking to the
rack1-gateway router. As a result, we really only need to create a BGP peer for this router.
cat << EOF | oc apply -f -
apiVersion: metallb.io/v1beta2
kind: BGPPeer
metadata:
  name: rack1-bgp-peer
  namespace: metallb-system
spec:
  myASN: 64998
  peerASN: 64999
  peerAddress: 192.168.10.1
  password: "f00barZ"
EOF
The poc-bgp project we used to configure our BGP software router uses the 64999 ASN for all of the leaf routers and
configured a password of f00barZ. Since we’re pairing with one of these leaf routers, rack1-gateway, we needed to
configure these. We chose the 64998 ASN for ourselves.
Finally, the BGP advertisement. Because MetalLB supports both a BGP and an L2 mode, it is possible that you could have some IP addresses that are meant to be assigned using BGP and other IP addresses that are meant to be assigned using ARP. In our case, we are only configuring MetalLB in BGP mode and only have a single IP address pool, which means we can advertise all IPs via BGP.
cat << EOF | oc apply -f -
apiVersion: metallb.io/v1beta1
kind: BGPAdvertisement
metadata:
  name: bgpadvertisement
  namespace: metallb-system
EOF
With those three CRs created, we can validate that they have been in fact created.
❯ oc get -n metallb-system ipaddresspool
NAME            AUTO ASSIGN   AVOID BUGGY IPS   ADDRESSES
ipaddresspool   true          false             ["192.168.50.1-192.168.50.254"]
❯ oc get -n metallb-system bgppeer
NAME             ADDRESS        ASN     BFD PROFILE   MULTI HOPS
rack1-bgp-peer   192.168.10.1   64999
❯ oc get -n metallb-system bgpadvertisement
NAME               IPADDRESSPOOLS   IPADDRESSPOOL SELECTORS   PEERS
bgpadvertisement
Wonderful!
Dealing with port security issues
With the above steps completed, our configuration of MetalLB is complete. However, if you were to create a Service
with type=LoadBalancer now, you would find it doesn’t actually work. This is because Neutron has MAC spoofing
protection that is enabled by default. The fact that our worker node is advertising IP addresses that neutron does not
know about triggers this protection and results in packets getting dropped as they egress our worker node.
To work around this issue you have two options: you can disable port security, or you make use of neutron’s
allowed-address-pairs extension to allow additional IPs, subnets, and MAC addresses, other than the fixed IP and MAC
address associated with the port, to act as source addresses for traffic leaving the port/virtual interface. Let’s
start with the former.
Disable port security
Disabling port security requires removing any existing allowed address pairs, removing any security groups, and finally disabling port security in general. If you you opt to do this, you will need to do this it for all worker node ports. As we only only have one worker node here, there is only one port to worry about, but you can trivially script the removal of port security for a larger number of ports using openstackclient or something like Ansible. For example:
ports=(
    stephenfin-qfnvm-worker-0-97fkv
)

for port in "${ports[@]}"; do
    openstack port set --no-allowed-address "$port"
    openstack port set --no-security-group "$port"
    openstack port set --disable-port-security "$port"
done
This is definitely the simpler option, though you will obviously be reliant on something else to provide network security. Let’s look at the alternative option.
Configure allowed address pairs
The allowed-address-pairs extension can be used to allow egress traffic from a VM with an IP outside of the one
configured on the neutron port. From the docs:
The
allowed-address-pairsextension adds anallowed_address_pairsattribute to ports. The value ofallowed_address_pairsis an array of allowed address pair objects, each having anip_addressand amac_address. The set of allowed address pairs defines IP and MAC address that the port can use when sending packets ifport_security_enabledistrue(see theport-securityextension). Note that while theip_addressis required in each allowed address pair, themac_addressis optional and will be taken from the port if not specified.
If you inspect the ports assigned to the master and worker nodes, you’ll note that we already have some allowed address
pairs defined. OpenShift on OpenStack uses this feature to enable load balancing of the ingress and API VIPs and we can
opt to use it for load balancing of services also. Unfortunately, there is no easy way to create allowed address pairs
for all IP addresses in a given subnet, nor to create them in a manner where they apply to all hosts. As a result,
applying this will be tedious and scalability may well become a concern, particularly where there is a large number of
worker nodes or a large range of IP addresses (via IPAddressPool). Since we only have one node and will only create
one example, we can at least try it out.
❯ openstack port set --allowed-address=ip-address=192.168.50.1 stephenfin-qfnvm-worker-0-97fkv-0
If you wanted to create multiple services, you would need to create an allowed address pair for each and every IP
address specified in the IPAddressPool(s).
This is the more involved option but either option should work. In any case, with port security issues mitigated, we are finally in a position to validate behavior.
Testing it out
Let’s create a simple “Hello, world” example to test this out. We’ll use the e2e-test-images/agnhost image to do this:
❯ oc new-project test-metallb
❯ oc create deployment hello-node --image=k8s.gcr.io/e2e-test-images/agnhost:2.33 -- /agnhost serve-hostname
❯ cat  << EOF | oc apply -f -
---
apiVersion: v1
kind: Service
metadata:
  name: test-frr
spec:
  selector:
    app: hello-node
  ports:
    - port: 80
      protocol: TCP
      targetPort: 9376
  loadBalancerClass: metallb.universe.tf/metallb
  type: LoadBalancer
EOF
This should look very familiar if you’ve ever worked with services. In fact, there’s nothing unusual here aside from our
use of spec.type=LoadBalancer and the declaration of spec.loadBalancerClass. The former ensure we actually use a
load balancer while the latter ensures that the load balancer used is MetalLB rather than Octavia.
Once created, inspect the service to find the IP address assigned:
❯ oc get service test-frr
NAME       TYPE           CLUSTER-IP       EXTERNAL-IP    PORT(S)        AGE
test-frr   LoadBalancer   172.30.130.128   192.168.50.1   80:32519/TCP   2m13s
From this, we can see that the service has been assigned IP 192.168.50.1. If we curl this, we should get something
back. Let’s test it out.
❯ curl 192.168.50.1
hello-node-855787d74c-fkbt5
And it works. Good job, people!
Wrap Up
In this post, we deployed MetalLB via the MetalLB Operator, configured it a minimal manner, and worked around the port security issues that using an external routing solution with neutron presents. As you can see though, port security issues aside, the actual process of deploying and configuring MetalLB is rather effortless.
In a future post, I plan to outline some of the steps I used to debug and resolve issues I had deploying this initial configuration (there were a few). For now, I hope this was helpful to someone.